Hiking the Mt Baldy Summit & Eating at Top of the Notch Restaurant
As an avid hiker, I love the sheer amount of peaks, waterfalls, and rivers that Southern California has to offer. While many of the easier ones are crowded and not taken care of, Mt Baldy is a hike that provides a surreal experience and is a lot more accessible than you think. The start of the Mt Baldy trail is about 15 minutes off the freeway in the small Mt Baldy Village. You can see information on both the Devils Backbone Trail and the Ski Hut Trail below.

Details
- Multiple ways to do the hike but this post is taking the lift to the Mt Baldy Notch and hiking from there.
- It is around 6.5 miles and 2,000 feet of elevation gain via the lift and 8 miles and 4000 feet via the Ski Hut Trail
- Note that the life doesn’t always run every day and you want to check before you go.
A little background on the mountain is as follows:
“Mount San Antonio, also known as Mt Baldy, at 10,068 ft (3,069 m), is the highest peak in the San Gabriel Mountains, and the highest point in Los Angeles County. The peak, which marks a boundary between San Bernardino County and Los Angeles County, is called Baldy because of the absence of trees around the summit. The Tongva tribe calls the mountain Yoát or Joat, which means snow, and the Mohave call it Avii Kwatiinyam.”
The Lift
Mt Baldy has multiple ways to the summit, two from the parking lot at the base and one “cheating way,” which is the way that we took. During the summer months, Mt Baldy is not the ski area that it is during the winter, so it runs its lift for hikers and people who want to have dinner or lunch at the Top of the Notch Restaurant. The restaurant itself sits at 7,300 feet and offers beautiful views of the surrounding mountains and cities. The lift costs $20-$25 dollars (as of 2016). Again, check the dates and time the lift is open before going.

Now the hike from the lift to the summit is still a difficult one if you don’t hike very much. It is about 6.5 miles and 2,300 feet of elevation gain. Taking the lift cuts off 4 miles from your trek and 1,300 feet of elevation, making it a much more manageable climb for most people.
Devil’s Backbone
We set out from the notch and worked our way up the ski path to the base of the Devil’s Backbone. The Devil’s Backbone is an exciting part of the climb — it has sheer drops on both sides and an uphill hike that feels like you are walking up the backbone of a colossal animal, thus giving its name.


From there, you hit a traverse, where you have to hug the side of a hill as you walk across it, and it can be a little uneasy for those afraid of heights because there is nothing to break a fall. It is not a big deal during the summer, but in the winter it is a lot scarier.


The hike then bends around to weave through a forest before dumping you out at a broad plateau that has only a small amount of plant life and a view of the summit in the distance. From here on is where you gain most of the elevation during the last push.
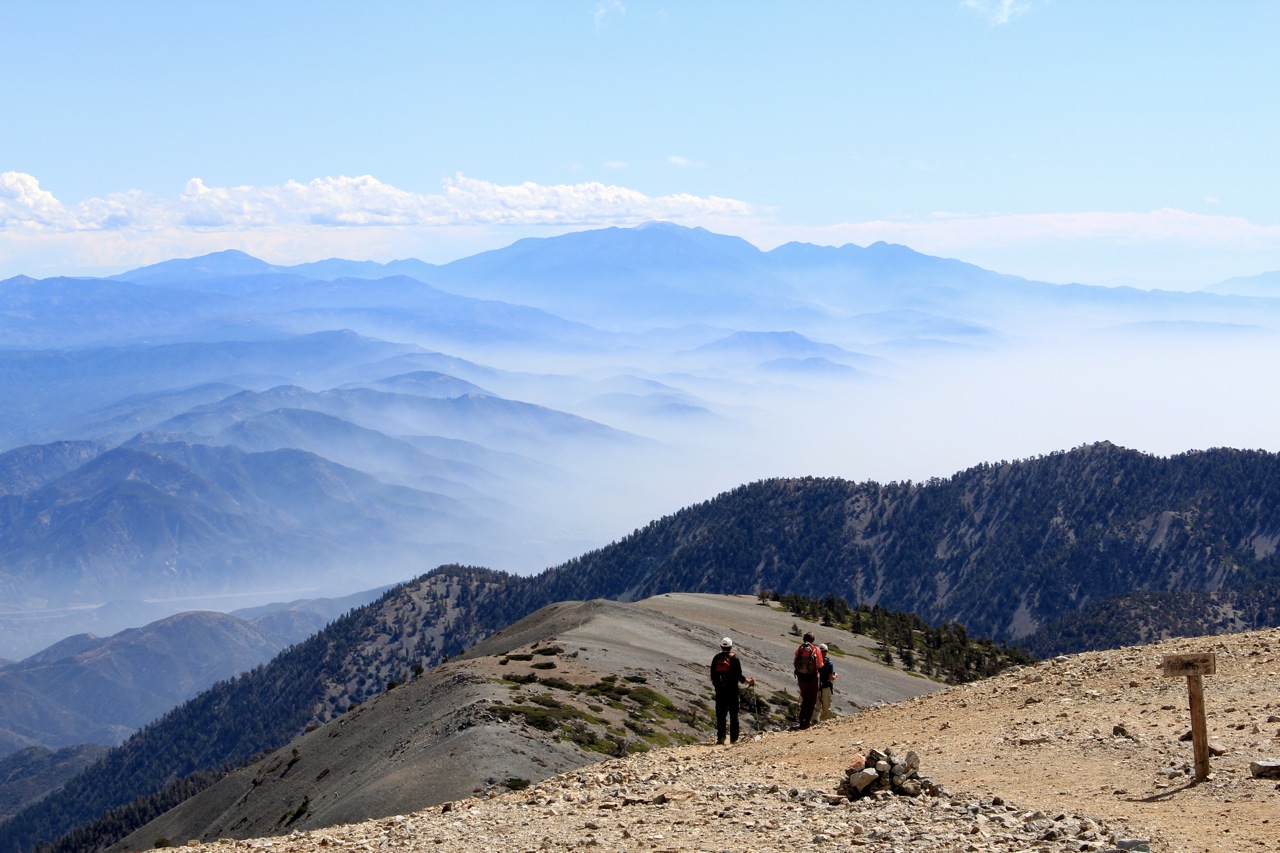
The Summit

This part of the hike is the worst, but it is entirely manageable as long as you take your time. Just keep pushing forward, and after what seems like a false summit, you will make it to the actual top. When we were there at least 30 people up there. It was a beautiful day, and people kept streaming in as we hung out. There was a memorial to September 11 up there with a flag and a sign that said, “Like the towers that soared before it so does this flag.” Check out the comments for Bill’s story on how they lugged the flag up in the middle of a rainstorm!

Make sure you plan for some time up here as the views are breathtaking, and you want to be able to take them all in. You can see San Gorgonio one way and Catalina Island the other (on a clear day).


Top of the Notch Restaurant
After we had spent a good amount of time on the summit, we made the trek back down. You lose a lot of elevation in a short amount of time, so be careful with your knees on the constant downhill. We arrived back at the Top of the Notch Restaurant and decided to stop in for a meal. Lunch was about $8 to $12 (in 2016) a person with a broad range of salads, hamburgers, and sandwiches. I got the highly recommended tri-tip, and it was a decent sandwich. I wouldn’t say it was anything to write home about, but the view and location of the restaurant make it worth going to visit. The lift itself is a fun ride as well.


My friend Joelle went for breakfast and said that was also worthwhile. They often have deals on Groupon for lift rides and breakfast, so make sure to keep your eyes peeled for them. Here is a picture of the breakfast she had, looks pretty good to me.


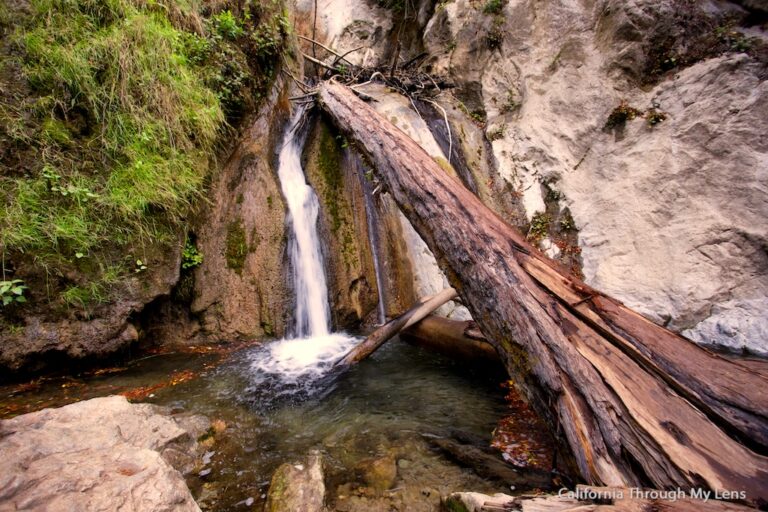
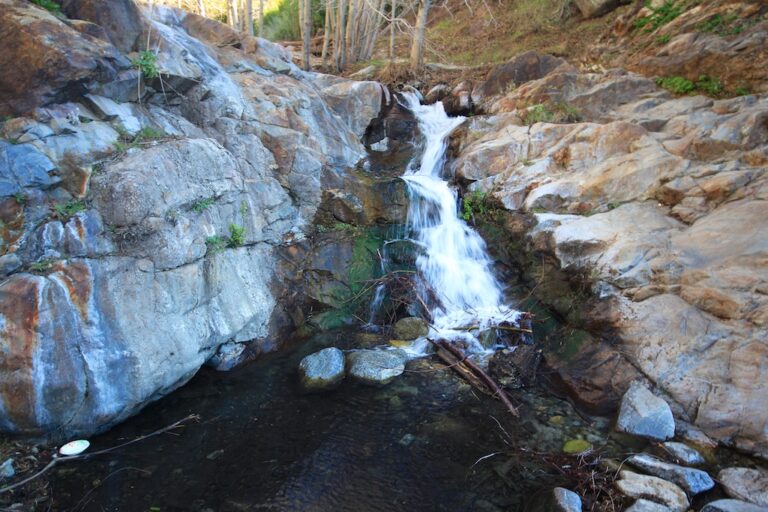
San Antonio Falls
If you elect not to take the ski lift, there is another way up the mountain, which is steep but pretty short and takes you past a couple of cool sites. The first of these is San Antonio Falls. The falls flow differently depending on the time of year. When we were there, it was flowing, but not too much. It is a beautiful stop about a half-mile from the start of the ski hut trail. You can see people at the base of the falls in the below picture to get a sense of scale.

Ski Hut Trail
After checking out the waterfall, you will go around a couple more bends then see the single track that takes you up the ski hut trail. This is a no-nonsense 4 miles that gain about 4,000 feet of elevation and really should not be underestimated. It is easy to miss the path, so check out the picture below of what it looked like when I was there. You want to go left.

From there, you will proceed up a lot of switchbacks until you reach the halfway point, which is the ski hut.
Ski Hut

The ski hut is a great place to relax and have a snack, and it even provides a small outhouse. I had no idea this was here until I was on this trail, and when I went up to the door, one of the volunteers was there and offered to let me walk around. The inside can sleep about ten people, and you can rent it out for the night if you have a big group of friends. There are a bunch of bunk beds in the top and then a communal room with a kitchen below. I cannot wait to do this because it seems like it would be a blast.


Here is a video I made on the hike up the Ski Hut Trail in 2023.
From there you simply head up the switchbacks to the summit, you have a real grind though from this point to get to the summit as there is a lot of elevation gain. We used this hike to prepare for our Mt Whitney Summit. Check out the rest of the details about the summit in the summit section above.
Let me know if you have done this hike, and make sure to add it to your list if you haven’t. Check out the rest of the pictures below.
Here is a video I made on my hike in 2016, it is an old video and funny to watch.